Friday, 19 April 2013

The Ups and the Downs of my Favourite Creations.


As I  mentioned in my first post, I love baking. My love for it began when I was little, as my Mum gave me so many opportunities to cook. From baking shortbread with her at Christmas time, to making kiss biscuits with my Nan, my love for it has never waned.

I have always been a bit of a sweet tooth, so I tend to sway towards sugar-based recipes. I am always up for a challenge, and in the past year, have attempted some desserts I have avoided for many years. And whilst the end product may look pretty, the process wasn't necessarily as attractive.


Blueberry and Custard Pies
 

As you can see above, I tried two different types of toppings for this specific filling. I was unsure whether the blueberry would make the pastry soggy, hence the meringue topping. However, what I found was that after the pies had cooled down slightly, the meringue began to pull away from the sides. This not only looks unattractive, but also causes difficulty when cutting the pie.

TPB TIP: To deal with this issue, make sure you spread the meringue mixture right out to the edge, covering the crust, anchoring it there. This should ensure that the meringue does not pull away after cooking.


Strawberry and Cream Spongecake

 
The infamous sponge. I had avoided this recipe for the entirety of my baking life, and after constant pleading from my Dad, I decided to give in. If I was going to fail, I might as well get it out of the way. After taking immense care with the sponge mixture, I ran into my first roadblock. The recipe asked for two tins of the same size, but I only had one. I made the decision that I would have to bake one cake at a time, and I had no idea what affect this would have on the end result.
My first cake came out beautifully, and I was so happy. I then looked at the mixture sadly waiting in the bowl, and it looked miserable. The airiness of the batter had disappeared, and it was flat and lifeless. I decided to try it out anyway. What a waste of 40 minutes that was. The cake came out of the oven looking worse for wear. It was dense and wet, and I was not a happy camper. I refused to give in, and made a second batch of mixture, which turned out perfectly!

TPB Tip: If you are making a spongecake which requires two cake tins, don't think you can defy the odds. Put the cakes in at the same time, or if you only have one tin like I did, make two half batches. It will save you a heap of stress and disappointment!

Also, be careful when leaving hot spongecakes on cooling racks. The mixture is generally very sticky, and will quite often stick to the wire. Recipes will call for the use of baking paper on top of the racks, but as I discovered, that does not prevent sticking either. My suggestion is that you monitor your cakes, transferring them from tray to tray every couple of minutes.


                                                                                    Chocolate Eclairs


And at last, we reach the eclair. A delicious treat, but one which does not come trouble-free. Over the past couple of years, I have attempted the croquembouche, and have been semi-successful. The one element which trips me up every time is the choux pastry. Either it doesn't rise like it should, and is dense and doughy, or it cracks.

For Christmas, my brother gave me a book dedicated to eclairs, so I decided I would attempt the tricky dessert one more time. I followed the recipe step by step ,with so much care, I thought nothing could go wrong. I was wrong wasn't I? The pastry was the right consistency, and looked great when I piped it onto the tray, but as soon as it entered the oven, it turned into a deep-fried mess. The butter oozed out of the eclairs, and ruined the pastry completely. I felt deflated and disappointed. But as I said before, I love a challenge, and was determined to beat this recipe.

I found another recipe online, and decided to give it a go, and voilĂ , it worked! The eclairs looked perfect!

Below is the recipe I used, to save you from any eclair disasters! (Taken from taste.com.au)

Basic Choux Recipe

      Ingredients
©   2/3 cup cold water
©   60g butter, chopped
©   2/3 cup plain flour
©   3 eggs, lightly beaten


  1. Combine butter and 2/3 cup cold water in a saucepan over medium heat. Cook for 3 to 4 minutes or until butter has melted and mixture just starts to boil.
  2. Reduce heat to low. Add flour. Cook, stirring, for 2 to 3 minutes or until mixture comes away from side of pan and forms a ball. Set aside for 5 minutes to cool slightly.
  3. Reserve 2 teaspoons egg. Using a wooden spoon, gradually beat in remaining egg until well combined and mixture forms a glossy dough (mixture should drop from the spoon).

Until next time, happy baking.

xx


Wednesday, 17 April 2013

Biscuit Boxes.


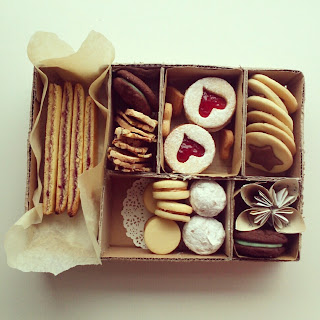
So last year for Christmas, rather than giving my close relatives presents, I decided I would bake them something. I found a great idea in Donna Hay's Celebrate magazine from 2011- a biscuit box, and I really wanted to give it a try! This entailed creating cardboard boxes, which had about six individual areas, then filling them with different types of homemade biscuits. I allowed myself about four weeks for this project.


I began the construction of the boxes, a process which took a lot longer than I first thought! After about two weeks, I finally finished! To make the boxes pretty, I tea-stained some paper, printed Christmas carols music onto them, and created paper flowers, which were placed into one of the segments. I also lined the sections with browned baking paper and paper doilies. If you want to try the paper flowers yourself, the link is here:


I planned which biscuits I was going to make, and started on the dough. I knew that attempting to make seven different batches of dough, baking and assembling them all on Christmas Eve would be too much work. However, I wanted the biscuits to be as fresh as possible. After all, they were going to be a gift. Admittedly, I was scared that freezing the dough would ruin it, but I was willing to risk it! Over the next few weeks, I made the dough for each type of biscuit. The biscuits were as follows:
 
Chocolate and Peppermint Creams, Cranberry and Pistachio Biscotti, Spiced Brown Sugar Cookies, Shortbread Caramel Sandwiches, Choc-Vanilla Cookies, Coconut and Jam Hearts & Sour Cherry and Lemon Shortbread Fingers.

Two days before Christmas, I spent the whole day rolling, baking and assembling the biscuits. Everything was working out fine, until my last batch of biscuits...just my luck!
The time then came for me to put the biscuits into the boxes! I wrapped them up in clear cellophane, and tied a beautiful big bow around each. To finish them was a great feat!

The overwhelming sense of satisfaction when I gave each couple the box made this experience totally worthwhile, and whilst it was a lot of work, I highly reccomend that you give it a try one day.

Below is the picture of my finished product!


One recipe which is cute and simple is the Choc-Vanilla Cookies. Here it is (Courtesy of Donna Hay):
 
 
Choc-Vanilla Cookies
 
Ingredients
©      1/2 cup castor sugar
©      125 g butter
©      1 egg
©      2 tsp vanilla extract
©      1 1/2 cups plan flour
©      1 tbl cocoa powder
 

Beat butter and sugar in a bowl until light and creamy. Add the egg and vanilla and beat until combined. Add the flour and beat until a smooth dough forms. Remove 2/3 of the dough, leaving 1/3 in the bowl. Add the cocoa to the bowl, and beat until combined. Roll each dough portion out between 2 sheets of non-stick baking paper to 3mm thick, and refrigerate for 30 minutes.
Preheat oven to 160 degrees celsius. Using a 7cm-round cookie cutter (I used a drinking glass), cut out as many circles as possible. Using a star-shaped cookie cutter, cut stars from chocolate dough and place on top of vailla rounds (I used a bit of milk under each star, to make sure it stuck! I also tried it in reverse, having the cookie round made of chocolate dough, and the star made out of vanilla dough). Place cookies on a lightly greased baking tray, lined with baking paper, and bake for 12-13 minutes, or until lightly golden (Make sure you keep a close watch, as I only had mine in for around 5 minutes. The dough is thin, and I wanted mine pale).


TPB Tip: Freezing dough works perfectly fine. Make sure you wrap the dough up tightly in gladwrap, and freeze immediately. The defrosting process takes around 1 hour.


Until next time, happy baking.

xx

Tuesday, 16 April 2013

Welcome.


Welcome to my blog, The Pink Baker.

I was fairly sceptical about starting up a blog, as I didn't think I would have anything to write about.
However, there is one thing in my life I love doing, and that is baking! Combined with my love for all things pink, I thought I could start a pretty blog, full of yummy treats, recipes and inspirational photos.

Wish me luck!

x

P.S. These amazing creations are not mine, but are definitely where I gain my inspiration from!

Picture. tthejourneyy.blogspot.com.au

Picture. ladylikei.files.wordpress.com

Picture. iambaker.net