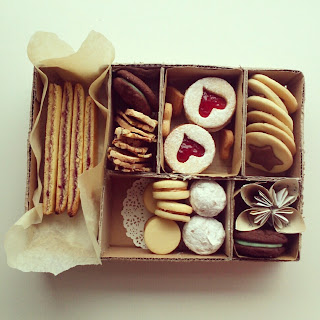
So last year for Christmas, rather than giving my close relatives presents, I decided I would bake them something. I found a great idea in Donna Hay's Celebrate magazine from 2011- a biscuit box, and I really wanted to give it a try! This entailed creating cardboard boxes, which had about six individual areas, then filling them with different types of homemade biscuits. I allowed myself about four weeks for this project.
I began the construction of the boxes, a process which took a lot longer than I first thought! After about two weeks, I finally finished! To make the boxes pretty, I tea-stained some paper, printed Christmas carols music onto them, and created paper flowers, which were placed into one of the segments. I also lined the sections with browned baking paper and paper doilies. If you want to try the paper flowers yourself, the link is here:
I planned which biscuits I was going to make, and started on the dough. I knew that attempting to make seven different batches of dough, baking and assembling them all on Christmas Eve would be too much work. However, I wanted the biscuits to be as fresh as possible. After all, they were going to be a gift. Admittedly, I was scared that freezing the dough would ruin it, but I was willing to risk it! Over the next few weeks, I made the dough for each type of biscuit. The biscuits were as follows:
Chocolate and Peppermint Creams, Cranberry and Pistachio Biscotti, Spiced Brown Sugar Cookies, Shortbread Caramel Sandwiches, Choc-Vanilla Cookies, Coconut and Jam Hearts & Sour Cherry and Lemon Shortbread Fingers.
Two days before Christmas, I spent the whole day rolling, baking and assembling the biscuits. Everything was working out fine, until my last batch of biscuits...just my luck!
The time then came for me to put the biscuits into the boxes! I wrapped them up in clear cellophane, and tied a beautiful big bow around each. To finish them was a great feat!
The overwhelming sense of satisfaction when I gave each couple the box made this experience totally worthwhile, and whilst it was a lot of work, I highly reccomend that you give it a try one day.
Below is the picture of my finished product!
One recipe which is cute and simple is the Choc-Vanilla Cookies. Here it is (Courtesy of Donna Hay):
Choc-Vanilla Cookies
Ingredients
© 1/2 cup castor sugar
© 125 g butter
© 1 egg
© 2 tsp vanilla extract
© 1 1/2 cups plan flour
© 1 tbl cocoa powder
Beat butter and sugar in a bowl until light and creamy. Add the egg and vanilla and beat until combined. Add the flour and beat until a smooth dough forms. Remove 2/3 of the dough, leaving 1/3 in the bowl. Add the cocoa to the bowl, and beat until combined. Roll each dough portion out between 2 sheets of non-stick baking paper to 3mm thick, and refrigerate for 30 minutes.
Preheat oven to 160 degrees celsius. Using a 7cm-round cookie cutter (I used a drinking glass), cut out as many circles as possible. Using a star-shaped cookie cutter, cut stars from chocolate dough and place on top of vailla rounds (I used a bit of milk under each star, to make sure it stuck! I also tried it in reverse, having the cookie round made of chocolate dough, and the star made out of vanilla dough). Place cookies on a lightly greased baking tray, lined with baking paper, and bake for 12-13 minutes, or until lightly golden (Make sure you keep a close watch, as I only had mine in for around 5 minutes. The dough is thin, and I wanted mine pale).
Preheat oven to 160 degrees celsius. Using a 7cm-round cookie cutter (I used a drinking glass), cut out as many circles as possible. Using a star-shaped cookie cutter, cut stars from chocolate dough and place on top of vailla rounds (I used a bit of milk under each star, to make sure it stuck! I also tried it in reverse, having the cookie round made of chocolate dough, and the star made out of vanilla dough). Place cookies on a lightly greased baking tray, lined with baking paper, and bake for 12-13 minutes, or until lightly golden (Make sure you keep a close watch, as I only had mine in for around 5 minutes. The dough is thin, and I wanted mine pale).
TPB Tip: Freezing dough works perfectly fine. Make sure you wrap the dough up tightly in gladwrap, and freeze immediately. The defrosting process takes around 1 hour.
Until next time, happy baking.
xx


This is beautiful Cobe!
ReplyDeletei wanna make these cookies asap!! :))
ReplyDeletevery nicely written information about Biscuit Boxes
ReplyDelete